I I haven't been blogging and I'm sorry my friends. It can be so time consuming..and lately all my time has gone to the kids and sewing, tutoring(can't wait till thats over), cooking...and also, I've run out of ideas or I have too many ideas and I don't know where to start. Not to mention I'm still uncomfortable with the idea of the possibility of perhaps maybe freaks lurking, my camera stopped working and other people's blogs are so entertaining, they keep me up at night.
I have missed it though and although you're not all leaving comments all the time I know you're at least taking a peek..(I get the traffic reports) SO. If you're out there, thanks for stopping by and checking up. I promise to do better.
THE TUTORIAL
My friend
Becca and I (and her sweet baby Eve)got together today and made an awesome ring sling. IT WAS SUPER EASY ! Becca is quite the crafty girl, and makes everything look so easy, she has made a few slings of her own using these fabulous instructions from
Jan Andrea's site and I just had to learn. Jan Andrea's tutorial is a million times better than mine but just in case you want to see what I've been up to. Here's my shot at it.
*By the way---All good ideas instructions and suggestions are from Jan Andrea, not me. UPDATE: THIS IS FOR PERSONAL USE ONLY
JAN ANDREA EMAILED ME AND THESE WERE HER WORDS EXACTLY "...it's important to me that people not use my directions -- or derivatives thereof that produce an identical product"
SUPPLIES NEEDED:2 1/2 YARDS OF FABRIC (you'll need a somewhat heavy fabric without a wrong side. The fabric should be breathable (just stuff your nose in it to check) since babies faces can get smooshed in there. If using a calico fabric you will need to use a heavier one on the other side of it, to support the baby properly)
2 1/2 YARDS OF WOVEN OR HEAVIER FABRIC IF USING A THIN COTTON
SEWING MACHINE
SCISSORS
THREAD
LARGE ALUMINUM SLING RINGS (WHICH CAN BE PURCHASED FOR $3.50
HERE)
BABYStep 1:
Get a cute baby, and hold it and love it so so much that she wants to be held all the time (like mine, not you Eve, you were very well behaved)

Prewash all fabric.
Step 2:
I used white linen for my heavier fabric and just folded it in half and cut. (I have no idea how wide it was, if you really need to know I can find out. (let me know)


Step 3: lay the fabric you've just cut on top of your print fabric and cut.

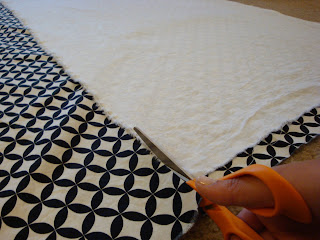
Step..where are we? sew a straight stitch around the two long sides and one short side leaving one short side open.
Do not fold in and sew because later on this will add too much bulk. Instead, sew it shut with the seams all sloppy and frayed like that showing and cut a really straight line close to the edge and then just ZigZag along the entire edge.


Top stitch around the whole thing.

For the pleats...Starting from the edge closest to you measure about 4 inches then pinch and grab the fabric folding over the 4 inches and leaving it about 1 inch from the edge...does this make sense?
Look here if you need another visual. Pin you r pleats in place on the top and 3 inches or so down.


On the last bit of fabric left over (after making 5 or 6 pleats depending on your fabric's width) fold under so you have a nice edge on the end.
Sew 2 loose rows of stitching (I think they call this basting) through all these layers.


Put both rings in. Bring your fabric past the lower stitch line and proceed to sew two or three rows of stitches...over and over and over again.


(the above pic is not the final product, just the baste stitch..you must stitch over the lines several times.. and in between them too if you like. When you're all done and the sling feels secure.
Fold the end of the fabric like so.

put your fabric through the rings (like a fabric belt you know?) fan out the fabric. Make sure it doesn't twist in there while wearing baby.

And finally...you get to wear the cutest accessory ever...Eve served as our little model and I missed my little girl who did not come along. When I got home and put her in her new sling she proceeded to throw her arms up in the air and do a backbend..over and over. She thinks it's hilarious.

Thanks so much Becca. I had the best time. The sling is already getting tons of compliments and you are my new go-to girl for children's literature. These books were all great, I'm getting them all. You all should too, your kids will love them.

Studious Eve in front of her library. Precious!

Becca actually read this to me while I was sewing. I LOVED this book (Don't let the pigeon drive the bus)

And after all that , she even sent me home with homemade strawberry jam her mom made when she was in town. It was so so good, you r mom has got some mad skills. Daniel had to have some as soon as I got home.

Thanks again Becca!
◦

Ring Sling Tutorial!
 Sutton Grace Blog (new to me) is amazing. This mom turned an old entertainment center--into this..go see the before and how she did it. Seriously drool-worthy. If I ever have a playroom again I'm so doing this.


 ◦
◦


 Posts
Posts


